Welp it only took me until March but I remembered I should update you guys. I swear I think about this blog a lot, I just really don’t have the time to sit down and update it. Between work, house responsibilities, actual sewing, writing and my other hobbies I just never seem to find the time to write a post. But hopefully as I get more and more things done I will be more and more excited to blog about them.
ANYWAY, let’s get into what you are all actually here for, which is the sewing progress. This post is actually probably going to end up being a bit long so maybe that makes up for it taking so long? Yes? No? Okay.
So the first thing I want to talk about is the bigger project. Which is a skirt I am making for my sister. It is at this point 98% done, it is just waiting to be shortened because I made it WAY too long and it needs to have a drawstring threaded through the waistband.
But this project was a lot of fun and a lot of trial and error. As the title of this post suggests, it is a reversible skirt. Which is something I have not made before, I have never made anything reversible before. But I had an understanding of the concept and decided to try it out anyway. And I am happy to say that even though a lot of things went wrong during this project, the reversible aspect of it came out right! Also I think I used my iron the most during this sewing project then I have have before. Usually I do my ironing after the garment is made unless I am making things like waistbands or bias tape. Which I know is not proper seamstress behavior but I just don’t get along with my iron. But I did iron ever single seam of this project after it was made to set it and help keep everything flat and where it belonged. So yes. Anyway, onto the skirt.


My sister (and I) love the Legend of Zelda franchise so of course the fabric she purchased for me to use was two different LoZ prints. One of which I have worked with before when I made my 1960s inspired sheath dress.
So for the basic construction of this dress I was following along with this Rectangle Skirt tutorial. But seeing as I planned to make the skirt reversible I had to break off from the tutorial around the time the waistband and the zipper got involved.
So I cut each fabric into three long squares and sewed them together so I had two very long rectangles. Then I placed them right sides together, matching all the seams, and sewed around both sides and the bottom. After I trimmed the seams and turned the whole thing right side out I top stitched around those three sides again.


Now this created a perfect hemmed edge, but unfortunately what I didn’t realize at the time was that the skirt was way longer then originally intended. Which means I will have to do a new hem later. But it was beautiful and easily done while it lasted!
I then sewed the top edge shut and gathered the skirt down from hand before making the waistband. Which I made in a similar way to the skirt to make sure it was also reversible. HOWEVER I wasn’t planning on putting a zipper in but instead making the skirt into an elastic waistband. So I only sewed and top stitched the top edge of my waistband, leaving the other three ends opened. This meant I was able to sandwich my gathered edge of my skirt into the waistband so all my raw edges were sealed away. And the ends were open so that I could thread the elastic band in later. We’ll come back to the waistband in a little bit, because the next thing I did was the seam. Given the nature of the skirt, I was left with only one seam to sew up. Which I chose to sew with a French Seam. This meant all the edges of the garment were finished and it was reversible. The last thing I did was insert the elastic into the gap left in the waistband before I hand stitched it closed.


But the skirt was unfortunately not as finished as it appeared to be. The fabric itself didn’t have enough stretch to it to accommodate the elastic so my sister wasn’t able to get the skirt on or off without help. I think when I measured the elastic around her waist I might have also made it too short to be comfortable. So I had to rip the elastic out. I decided a drawstring situation would be best, and she could knot the ties at the waist for a cute detail. So to make sure she could get the garment over her hips I undid one of my side seams a few inches to create a comfortable opening. I hand stitched all the openings so it was all closed up again. And more importantly the garment remained reversible. ((I’m really proud that it’s reversible, can’t you tell?)) I am going to use the excess fabric I have left over from shortening the skirt to make the drawstring. A) so that I am not wasting fabric and B) so the garment is still uniform.
BASICALLY as far as I see this project, for everything that went really well something else went really wrong. But as it is it is nearly done and nearly perfect. So by the next time I make a post I will hopefully have pictures of the worn garment for you.
Onto my next project which is actually an ongoing process and has been very time consuming. I have taken it upon myself to hand embroider patches for myself and three of my very best friends for our jackets which we are fondly calling out ‘girl gang jackets.’
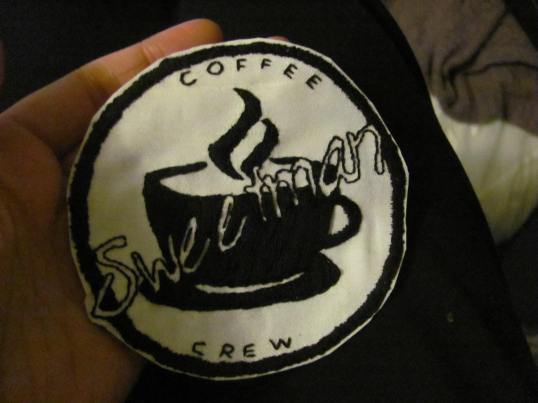
I designed the patches myself, using public domain clip art and a lot of fussing with angles and fonts on Paint.net. We call ourselves the Coffee Crew so I made sure that the group name was incorporated. Each patch will be identical except for the last names, of course. They will also differ from patch to patch given how iffy my hand work is at times. It isn’t easy when you have underdeveloped hand muscles and get wrist fatigue super easily. The patches are a bit bigger then I imagined they would be but I have fully committed to the size. So I have nobody to blame for how long this is taking except for myself.
I have one patch completely finished and a second has been entirely outlined. I’m in the process of filling in all the white space. I will eventually be covering the back of the patches with fusible.


The last thing I want to touch on in this post is some of the things I have purchased to go along with some of my cosplay projects. Because as I have learned from doing theater work, altering items to suit your needs is a life saver.
So the things I have bought are:
- Spikes and pyramid studs for my orig. Raven design.
- A nerf gun to paint and alter into Jyn Erso’s hand blaster.
- Space leggings for Solgaleo
- A sleeveless black turtleneck for Solgaleo and Luke Skywalker
- Overall shorts for an orig. Daredevil design for Free Comic Book Day
So anyway, thank you again for checking out my progress. I know it isn’t the most coherent but I don’t like working linearly on projects if I don’t have to. Working too linearly can stress//burn me out which is not something I want.
See you next time, which will hopefully be a lot sooner then three months. Cheers!

Great reversable skirt. That color Zelda pattern looks great as a skirt. My husband chose that same Zelda pattern so I can sew him something out of it. Still figuring out what I am going to make.
Thank you so very much! And it is such a great fabric. Maybe you can make him a really nice suit vest with it. I think it would look great as a little pop of color and personal style peeking out from a nice gray suit.
That sounds like a really great idea. Thank you. I do have a men’s suit vest pattern somewhere in my piles of patterns. :-)
I will be excited to see how it turns out, I hope you’ll post about it!
I definitely will if he wants me to make him a suit vest. ;-)